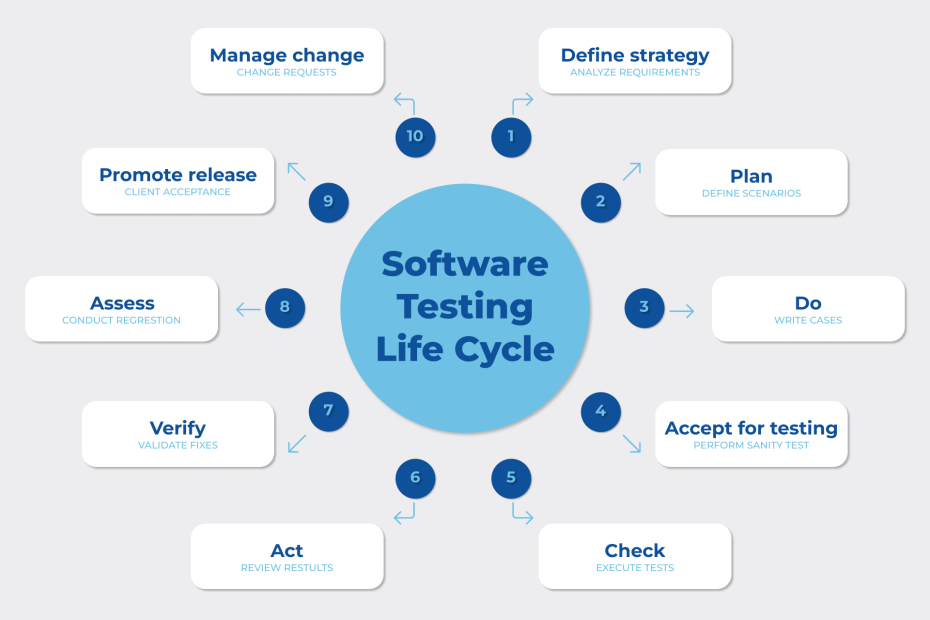
Software Testing's Importance
Program testing is critical because it allows you to find any faults or errors in the software early and correct them before you deliver the final product. A well-tested software product provides dependability, security, and excellent performance, which saves time, and money, and improves customer satisfaction.
Software testing is necessary for the following reasons:
1. Security
As a specific product undergoes testing, the users can be sure that they are going to receive a reliable product. Also, the personal details of the user can be safe. Users can receive products that are free from vulnerability with the aid of software testing.
2. Cost-Effective
Software testing has a lot of advantages. One of the most important reasons why companies choose software testing services is the project’s cost-effectiveness.
Software testing is made up of several initiatives. If you discover a bug early in the development process, the cost to repair it is lower. As a result, it is a need that you complete the testing as quickly as possible. When you engage quality analysts or testers for projects that have a lot of experience and have gone through technical school, you’re investing, and the project will profit from it.
3. Quality of the Product
Software testing is an art that aids in a company’s market reputation by delivering a high-quality product to the client according to the requirement specification papers. process.
4. Satisfaction of the customer
All of the preceding results in a satisfied client! As clients, we all expect system stability. If you test during the development lifecycle, you can see how well the program was designed. This increases customer trust.
5. Improvements to the development process
With the help of Quality Assurance, you may locate a range of scenarios and faults. You can use them to reproduce the problem.
It is quite easy, and the devs must correct it as soon as possible. Furthermore, software testers should work with the development team in tandem, which helps to speed up the development process.
6. Adding new features is simple
Change is more difficult the more integrated and older the code is. Tests help developers avoid calcification by letting them incorporate new functionality. Changing older sections of your codebase as a new developer might be difficult, but with tests, you’ll know whether you’ve broken anything vital. This allows your program to stand out in the market.
Categories of software testing
There are a variety of software tests, each with its own set of goals and strategies:
- Usability testing: validating a customer’s ability to execute a task with a system or online application.
- Acceptance testing: testing to see if the software system meets the requirements.
- Integration testing: individual units/components are merged and tested as a group in this stage of software testing.The goal of this level of testing is to find flaws in the way integrated units interact. In Integration Testing, test drivers and test stubs are employed.
- Functional testing: verifies the software system’s compliance with functional requirements and specifications. You can use it to check that the output of a software program meets the functional requirements by giving acceptable input.
- Performance testing: performance testing is a type of non-functional software testing that examines an application’s stability, speed, scalability, and responsiveness under various workloads.
- Regression testing: this is a way of testing software that ensures that an application continues to work as implemented after any code changes, updates, or upgrades.
- Stress testing: this actually involves testing the system’s ability to withstand a certain amount of stress before it locks up. This type of testing is a non-functional test.
- Unit testing: testing individual modules for errors. This is about the accuracy of the functionality of the independent modules. The basic purpose of this stage of testing is to isolate each component of the system so that faults can be identified, analyzed, and corrected.
- Non-functional testing: non-functional testing is a way of testing software that checks for non-functional aspects of software such as reliability, load testing, performance, and accountability. The main purpose of non-functional testing is to determine the read rate of the software system using non-functional criteria.
In this article, we will focus more on unit testing.
We use the following tools to unit test the software:
Google Test (GTest)
- It is built on the xUnit architecture.
- Is a collection of “Frameworks” for developing and automating test cases.
- It’s a C++ test-writing library.
The purpose of using a Google Test:
- We can use Google Test to help us develop better C++ tests.
- It separates the tests by executing each one on a distinct item, making them independent and repeatable.
- Google Test is portable and reusable, as it runs on a variety of operating systems (Linux, Windows, and Mac) and compilers.
- When tests fail, as much information as possible about the problem should be provided.
Google Mock (GMock)
- It is built on the xUnit architecture.
- Is a collection of “Frameworks” for developing and automating test cases.
- It’s a C++ test-writing library.
The purpose of using a Google Test:
- We can use Google Test to help us develop better C++ tests.
- It separates the tests by executing each one on a distinct item, making them independent and repeatable.
- Google Test is portable and reusable, as it runs on a variety of operating systems (Linux, Windows, and Mac) and compilers.
- When tests fail, as much information as possible about the problem should be provided.
Practice with google test and google mock
Technology Google test and Google mock require the usage of a build system like CMake, Bazel, Meson, or another build system.
Steps to perform the google test and google mock setup using the meson build system:
Project Setup with meson: To do this we must have a wrap file with the necessary configuration. For more details about the content of such a file, we invite you to read the official documentation of the meson construction system https://mesonbuild.com/Wrap-dependency-system-manual.html .
					[wrap-file]
directory = googletest-release-1.11.0
source_url = https://github.com/google/googletest/archive/release-1.11.0.zip
source_filename = gtest-1.11.0.zip
source_hash = 353571c2440176ded91c2de6d6cd88ddd41401d14692ec1f99e35d013feda55a
patch_filename = gtest_1.11.0-1_patch.zip
patch_url = https://wrapdb.mesonbuild.com/v2/gtest_1.11.0-1/get_patch
patch_hash = d38c39184384608b08419be52aed1d0f9d9d1b5ed71c0c35e51cccbdddab7084

[provide]
gtest = gtest_dep
gtest_main = gtest_main_dep
gmock = gmock_dep
gmock_main = gmock_main_dep
Once the configuration is ready for this wrap file we can download in our project.
					# gtest_proj is a variable with which we can download Google Test and Google Mock
# It will be downloaded to the subdirectory where our wrap file is located.
  gtest_proj = subproject('gtest')
-> building the executable:
					e = executable('logic-tests',
                sources: src,
                dependencies: [gtest_dep, gmock_dep],  dupa :
                link_with: [gtest_lib, gmock_lib]
              )
The following data will be included in the executable:
- his name between ‘ ‘
- the source files we want to test.
					src = [
            'Parallelepiped_test.cpp',
            'Parallelepiped.cpp',
      ]
- Access to libraries and use of dependencies
					  # gtest_dep => creating dependency for GTest
  gtest_dep = gtest_proj.get_variable('gtest_dep')


  # gmock_dep => creating dependency for GTest
  gmock_dep = gtest_proj.get_variable('gmock_dep')


  # obtaining the libraries
  gtest_lib = static_library('gtest', install : true)
  gmock_lib = static_library('gmock', install: true)
Preparation for the testing process:
- Writing the main function corresponding to the test:
					int main(int argc, char **argv)
{
    testing::InitGoogleTest(&argc, argv);


    return RUN_ALL_TESTS();
}
- Mock Class Preparation
					class MockParallelepiped
{
    public:
        MOCK_METHOD(int, ParallelepipedArea, (int , int ));
};
Incorporating Mocks into Tests:
- Import the Google Mock names from the testing namespace so that you may use them without qualification. You need to do this only once per code. Keep in mind that namespaces are a good notion and beneficial to your health.)
- Make some fictitious things.
- Define your expectations for them. For example: How many times will you call a function?. What arguments are you using? What should it do, and so on).
- Exercise some code that makes use of the mocks; optionally, utilize Google Test assertions to verify the result. If you call a fake method more than once or with incorrect parameters, you’ll get an error right away.
- When a mock is destroyed, Google Mock checks to see if all of the expectations associated with it are fulfilled.
Practice with google test and google mock
The function we want to test:
					int ParallelepipedArea(int length, int width)
{
    int area = length * width;

    return area;
}


int ParallelepipedVolume(int height, int length, int width)
{
    int area = ParallelepipedArea(length, width);
    int volume = height * area;
    return volume;

}
Our google test and google mock test:
					TEST(Parallelepiped_test, ParallelepipedVolume)
{
    MockParallelepiped parallelepiped_mock_obj;


    // values for the parameters of our functions
    int length = 1;
    int width = 1;
    int height = 1;

    ON_CALL(parallelepiped_mock_obj, ParallelepipedArea(length, width))
    .WillByDefault(testing::Return(11));

    EXPECT_EQ(ParallelepipedVolume(height, length, width), 11);


}
The next step is to compile and run the file to see the test results.
					PS C:\Users\siclo\OneDrive\Desktop\Testare\lovelybuild> meson compile
[2/2] Linking target logic-tests.exe
PS C:\Users\siclo\OneDrive\Desktop\Testare\lovelybuild> .\logic-tests.exe
[==========] Running 1 test from 1 test suite.
[----------] Global test environment set-up.
[----------] 1 test from Parallelepiped_test
[ RUN      ] Parallelepiped_test.ParallelepipedVolume
[       OK ] Parallelepiped_test.ParallelepipedVolume (0 ms)
[----------] 1 test from Parallelepiped_test (17 ms total)

[----------] Global test environment tear-down
[==========] 1 test from 1 test suite ran. (59 ms total)
[  PASSED  ] 1 test.
Now that we’ve reached the end of the article let’s talk a bit about our test.
The function we want to test is “ParallelepipedVolume” this function returns the volume. In this function, we can find another function called “ParallelepipedArea” which returns the area.
In the “ON_CALL” macro we tricked the “ParallelepipedArea” function to return something different from what it would return if we put the specific parameter values.
And in the “EXPECT_EQ” macro we expect the “ParallelepipedVolume” function to return the right thing given the mock above.
Dependency injection relationship:
Dependency injection is a design technique in which one item is matched by another object that it relies on. This technique separates the responsibilities of creating and using objects, resulting in loosely connected applications.
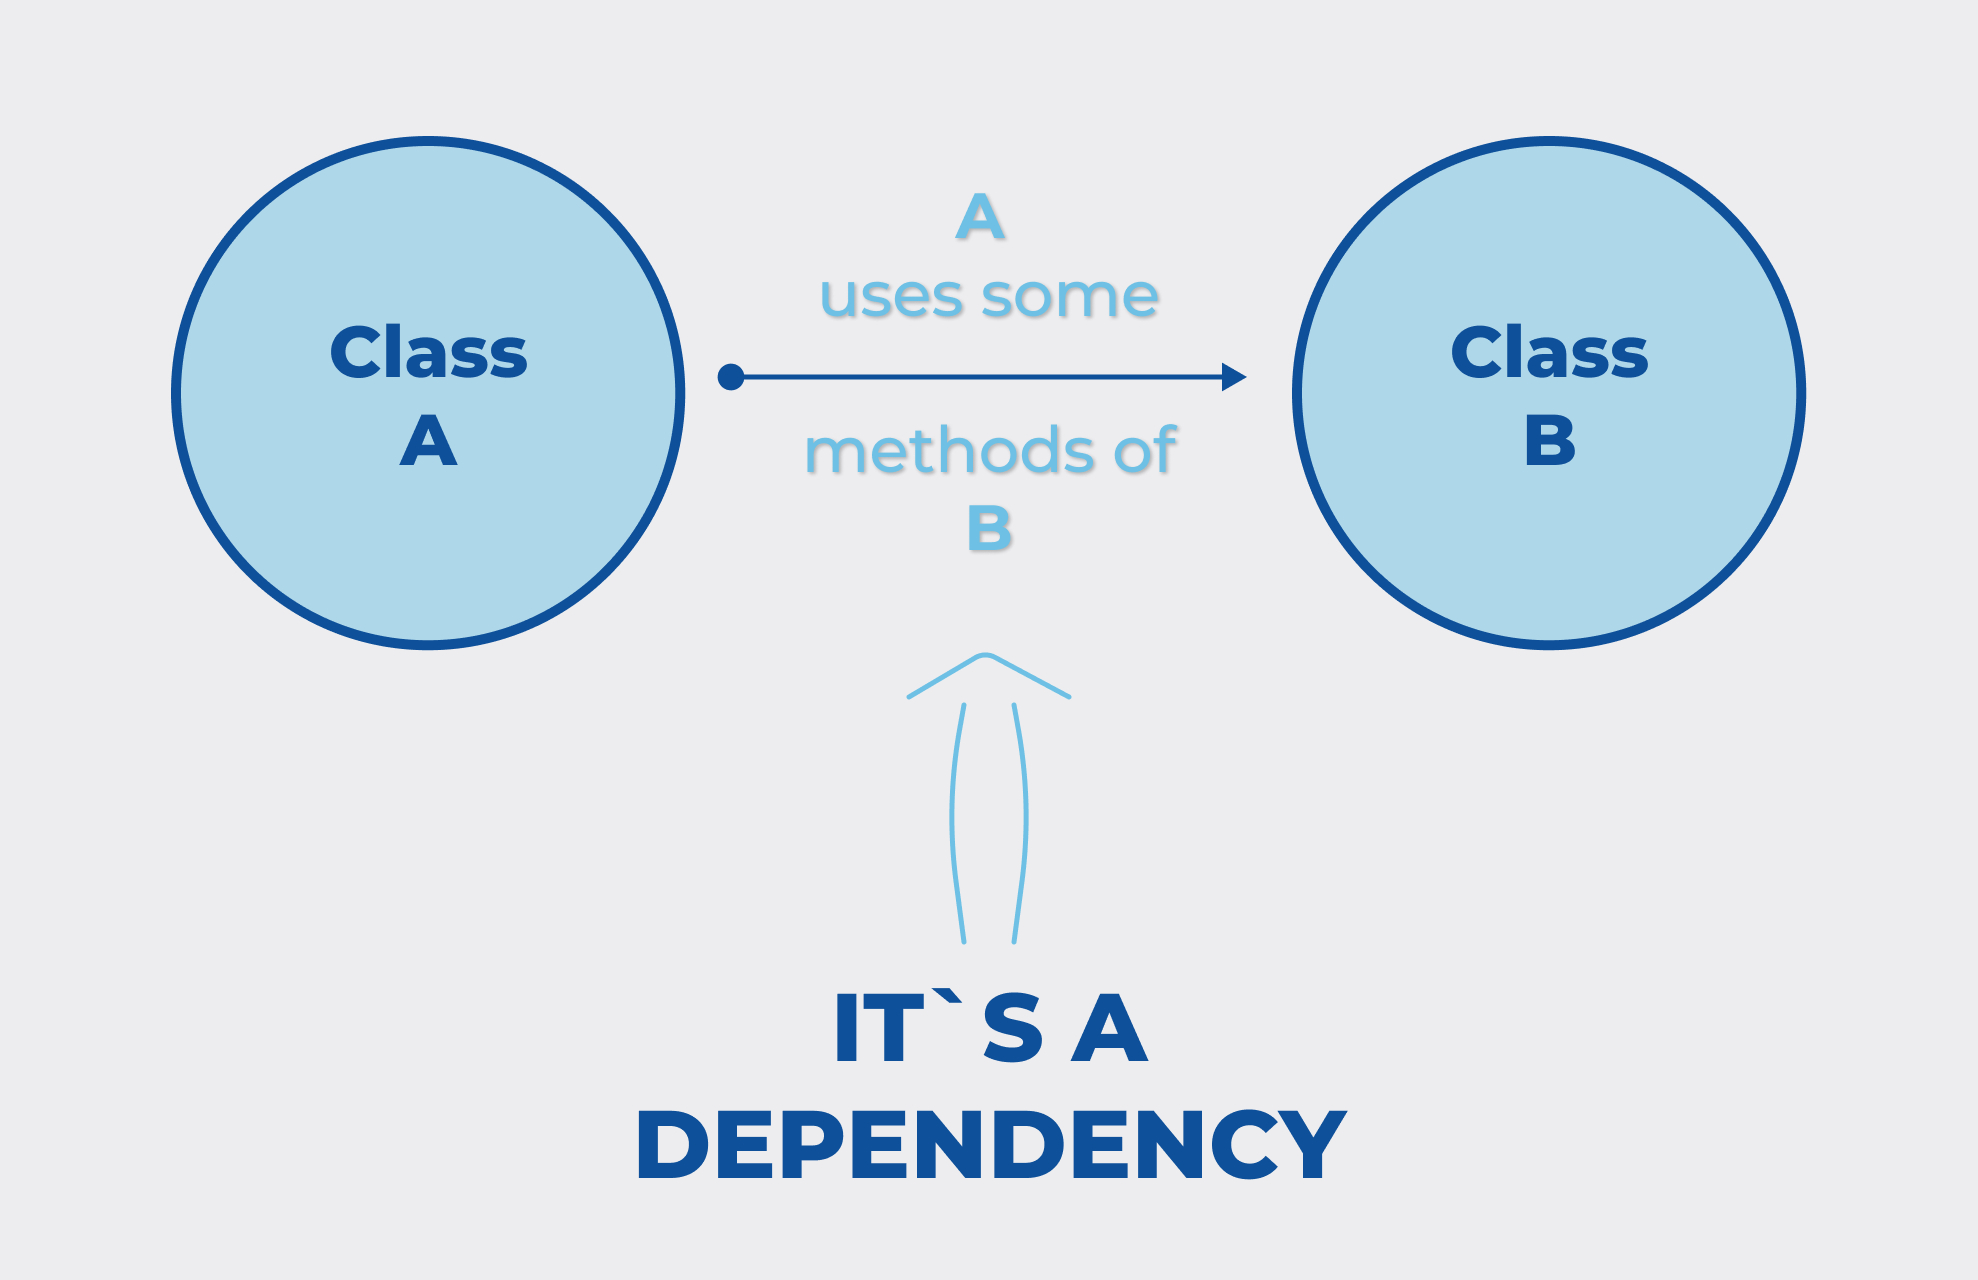
A design pattern is a solution that is used to solve a common problem during the development of software. It is a description or template for solving a problem that can be applied to a variety of scenarios.
Now, let’s illustrate what we just talked about:
class interfaceParallelepiped
{
public:
virtual int ParallelepipedArea(int length, int width) = 0;
};
class parallelepiped : public interfaceParallelepiped
{
public:
int ParallelepipedArea(int length, int width)
{
int area = length * width;
return area;
}
int ParallelepipedVolume(int height, int length, int width, interfaceParallelepiped& interface_parallelepiped_obj)
{
int area = interface_parallelepiped_obj.ParallelepipedArea(length, width);
int volume = height * area;
return volume;
}
};
class mockParallelepiped
{
public:
MOCK_METHOD(int, ParallelepipedArea, (int, int));
};
TEST(testing_files, ParallelepipedVolume)
{
mockParallelepiped parallelepiped_mock_obj;
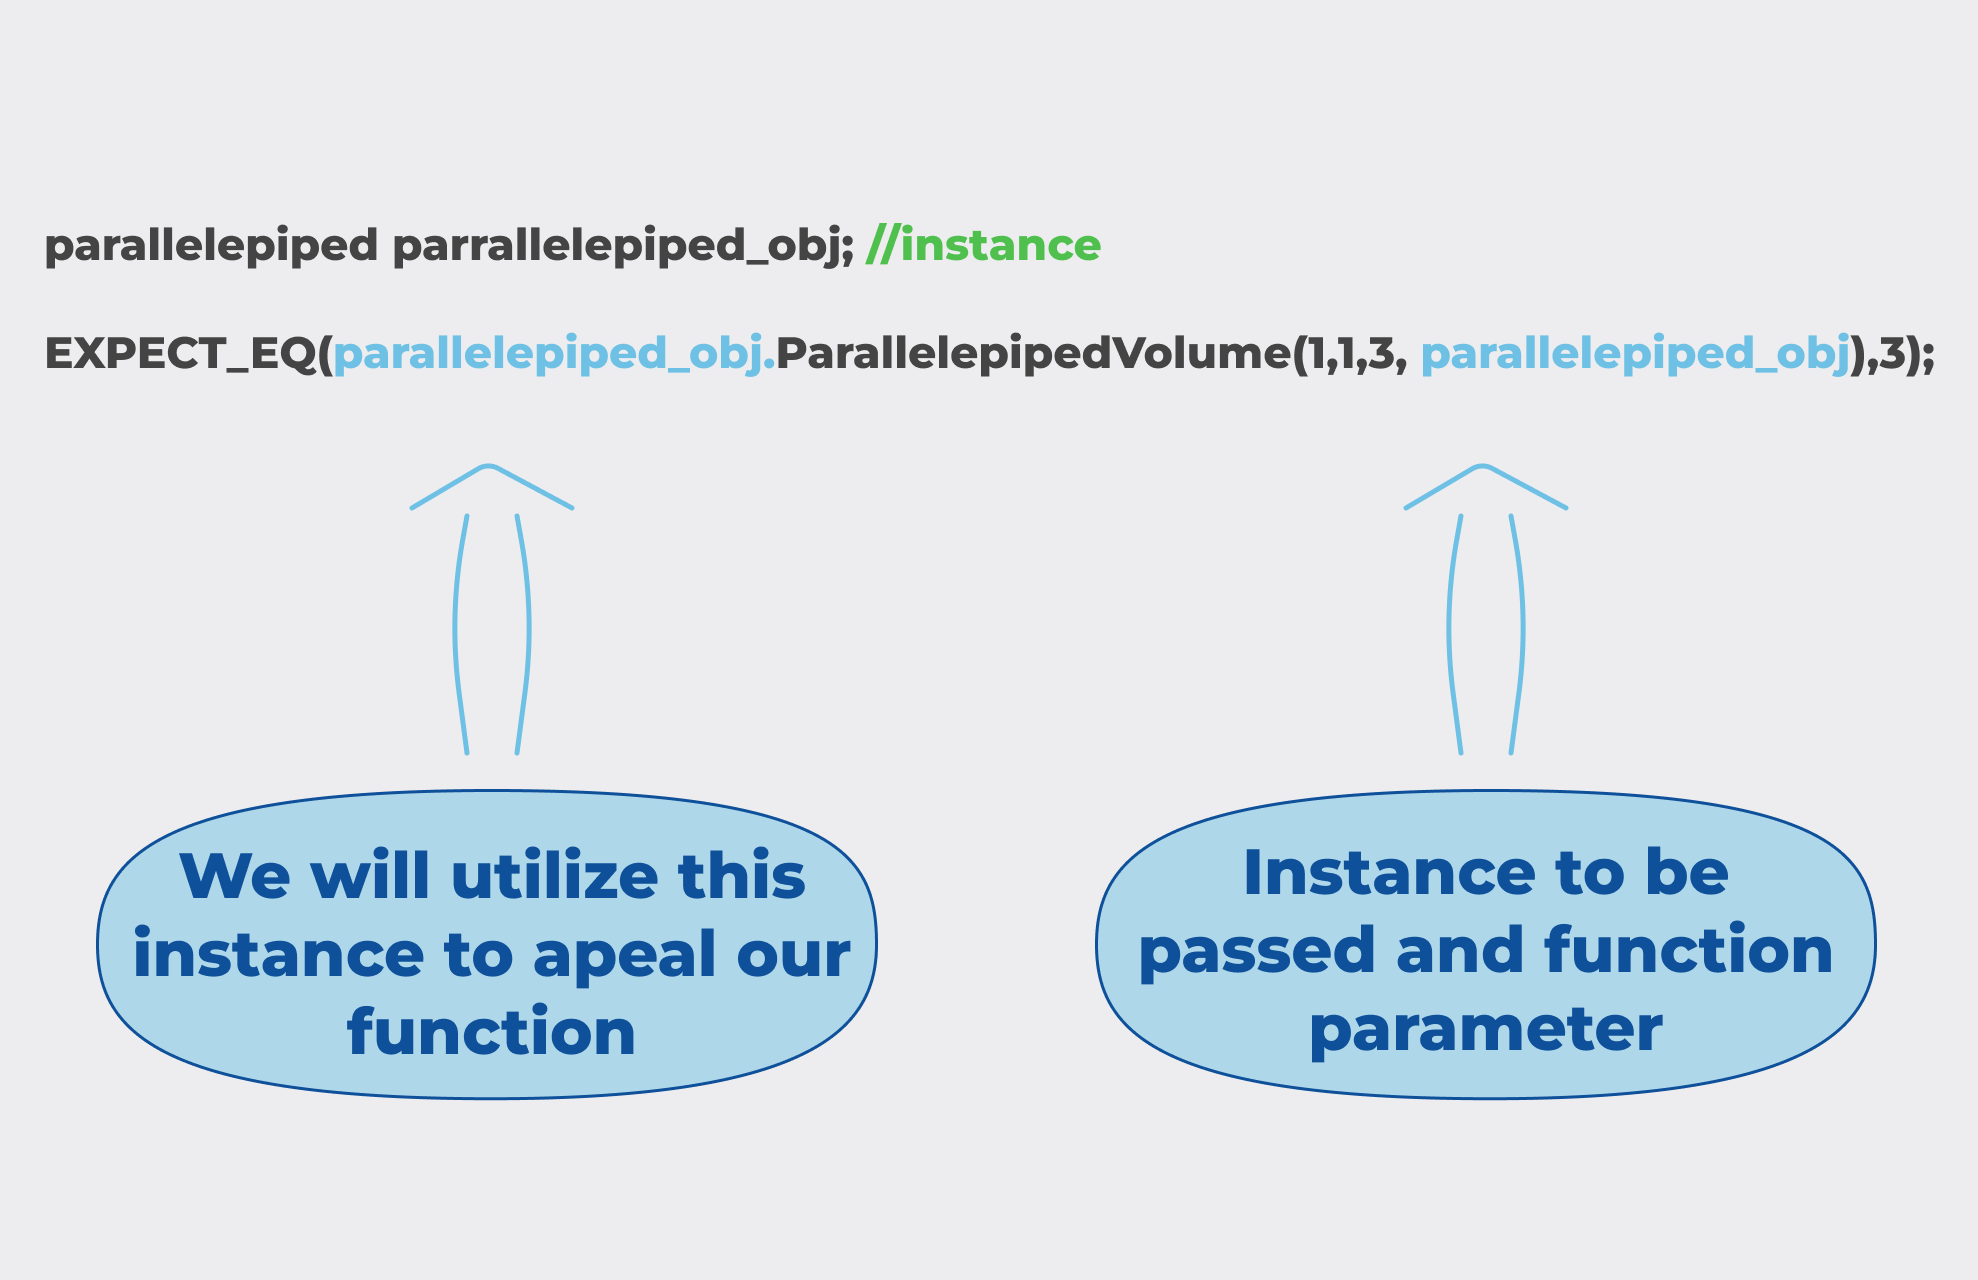
parallelepiped parallelepiped_obj;
ON_CALL(parallelepiped_mock_obj,ParallelepipedArea(1,1)).WillByDefault(testing::Return(2));
EXPECT_EQ(parallelepiped_obj.ParallelepipedVolume(1, 1, 3, parallelepiped_obj), 3);
}
Output test:
					PS C:\Users\siclo\OneDrive\Desktop\Testare\lovelybuild> .\logic-tests.exe
[==========] Running 1 test from 1 test suite.
[----------] Global test environment set-up.
[----------] 1 test from testing_files
[ RUN      ] testing_files.ParallelepipedVolume
[       OK ] testing_files.ParallelepipedVolume (3 ms)
[----------] 1 test from testing_files (17 ms total)

[----------] Global test environment tear-down
[==========] 1 test from 1 test suite ran. (55 ms total)
[  PASSED  ] 1 test.
Let’s talk a bit about our example. We want to test the same function and apply mock on the same function as before, only this time we will do it through a design pattern called dependency injection.
As you can see we have a class “interfaceParallelepiped” which contains a pure virtual function named “ParallelepipedArea”. This interface will be inherited by a “parallelepiped” class that will override the purely virtual function so that our class is not an abstract one. The overridden function will be implemented in such a way that it returns the area of our parallelepiped. In this class, we will also add a function that will return the volume of our parallelepiped. This function, called “ParallelepipedVolume”, will get 4 parameters. Three are for height, length, and width, and the 4th one will be an instance of our interface with the help of which we will call the function “ParallelepipedArea” which will return the area.
Next, we will make a “mockParallelepiped” class that will mock the function inside the function we want to test, more precisely we will mock the “ParallelepipedArea” function. Finishing with these things, we can prepare the test function. It is not much different from our first example, as long as in our test function we will make an instance of the class “parallelepiped” for the macro “EXPECT_EQ”, our instance will be passed as a parameter to our function and we will also call the function using our instance.
Other features:
⦁ Multiple expectations in a single test:
An integration test may involve more than one expectation. When you use numerous expectations in a function, the order in which they will be processed or evaluated is also important. Expectations are assessed in the reverse order in which they were defined. The initial expectation whose matcher fits is always used for action and cardinality.
					ON_CALL(parallelepiped_mock_obj, ParallelepipedArea(length, width)) .WillByDefault(testing::Return(20));

ON_CALL(parallelepiped_mock_obj, ParallelepipedArea(length, width)) .WillByDefault(testing::Return(30));

ON_CALL(parallelepiped_mock_obj, ParallelepipedArea(length, width)) .WillByDefault(testing::Return(40));
⦁ Expectations with cardinalities:
EXPECT_CALL(parallelepiped_mock_obj, ParallelepipedArea(length, width)).Times(1) .WillOnce(testing::Return(20));
You can use a direct number to specify cardinality. You should call the function precisely one time in this situation. Zero is a valid specification as well. This verifies that the function hasn’t been invoked. A minimum number can be specified as well:
EXPECT_CALL(parallelepiped_mock_obj, ParallelepipedArea(length, width)).Times( AtLeast(1).WillOnce(testing::Return(20));
For the condition to be fulfilled in the example above, the function must be called at least once. It is also successful if it is called several times.
⦁ Expectations with actions:
You can use actions to give a fake certain behavior. The definition of a return value is a good illustration of this.
EXPECT_CALL(parallelepiped_mock_obj, ParallelepipedArea(length, width)).Times(1) .WillOnce(testing::Return(20));
During the function call, the value 20 is returned.
					int value_returned = 20;
int * pointer = &value_returned;
EXPECT_CALL(parallelepiped_mock_obj, ParallelepipedArea(2, 2)).Times(1) .WillOnce(testing::ReturnPointee(pointer));
Returns the value indicated by the pointer, i.e. the value in the variable “value_returned”. You can also find more information right here:
https://google.github.io/googletest/reference/actions.html
Assertion
The outcome of an assertion may be a success, nonfatal failure, or fatal failure. If a fatal failure occurs the current function will be aborted. Otherwise, the program proceeds normally. Assertions are used in tests to ensure that the tested code behaves right. A test fails if it crashes or has a failed assertion; otherwise, it succeeds.
Most of the macros listed below are presented as a pair with an EXPECT_ variant and an ASSERT_ variant. Using the EXPECT_ macro we can get non-fatal failures and allow the current function to continue running, whereas ASSERT_ causes fatal failures and cancels the current function.
EXPECT_EQ(ParallelepipedVolume(height, length, width), 11);
– Check if what it returns is equal to what it should really return, in short check if two values are equal.
EXPECT_NE(ParallelepipedVolume(height, length, width), 3);
– It is exactly the opposite of the EXPECT_EQ macro, it checks if two values are not equal.
Summary
To conclude, the descriptions prove how useful Google Test and Google Mock are for building automated tests in C++. Using Meson, the libraries may be readily incorporated into existing projects.
Moreover, Google Test provides several basic assertion writing options. You can also use Log messages and scoped traces to provide additional information to tests. Furthermore, the framework allows for the examination of more complicated problems like exceptions and aborts.
The frameworks’ most significant flaw is their lack of support for asynchronous functionality testing. Users on various platforms may face problems since Google Test is not considered a Threadsave.
References:
See other articles:
The /proc File System in Linux: A Comprehensive Guide
Introduction The /proc file system (procfs) is one of the most powerful and widely used virtual file systems in the Linux kernel. Unlike traditional
OpenRC
OpenRC is a dependency-based init system that was designed to work with Unix-like computer operating systems. It keeps compatibility with the system-provided init system,
Yocto Project
Yocto Project is an open source community project that helps developers to create customized systems based on Linux. It has an accessible toolset that
Component placement
Component placement is one of the most critical parts of PCB design. First, you must understand the fundamental criteria for arranging components on a
Linux System Programming
This article focuses on Linux system calls and other low-level operations, such as the C library’s functions. System programming is the process of creating system software, which
EMC Testing
When an electrical product is tested for electromagnetic compatibility (EMC) it is determined whether or not it will perform satisfactorily in the electromagnetic environment