Yocto Project is an open source community project that helps developers to create customized systems based on Linux. It has an accessible toolset that allows all developers to collaborate with shared technologies, software stacks, and configurations to create Linux images. Also, yocto enables software customizations and build interchange between many hardware platforms, as well as maintainable and scalable software stacks.
Yocto overview
- Build custom Embedded Linux;
- Development workflows – SDK, Devtool, Quilt;
- Poky build system;
- Creating recipes using BitBake;
- BSP & Distro layers.
Poky
Poky is a Yocto Project® reference distribution. It includes the OpenEmbedded Build System (BitBake and OpenEmbedded Core), as well as metadata to help you start creating your own distribution. You can get Poky and use it to bootstrap your own distribution using the Yocto Project tools.
Build tools:
- BitBake Tool (bitbake);
- OpenEmbedded-Core (meta);
- Yocto-specific Metadata (meta-yocto);
- Yocto-specific BSP (meta-yocto-bsp).
- Poky_repository
git clone git://git.yoctoproject.org/poky.git
- Openembedded_repo
git clone git://git.openembedded.org/meta-openembedded.git
source oe-init-build-env
					bitbake core-image-base
bitbake core-image-minimal
bitbake core-image-sato
bitbake microchip-headless-image
bitbake-graphics-image
Recipes
The most common file type in a Yocto build description is a recipe. They include instructions for configuring, compiling, deploying a specific piece of software, and the location of the source code.
BitBake recipes describe how a specific package is created. The package’s source URL (http, https, ftp, cvs, svn, git, local file system), dependencies, and compile or install options are all included in recipes. Also, they save the package’s metadata in standard variables.
What is in a recipe?
- Source code URL;
- Git branch and commit ID;
- Build dependencies;
- License;
- Configuration commands;
- Compilation commands;
- Installation commands.
Recipes are located inside of layers, some examples of recipes are recipes-bsp, recipes-core, recipes-connectivity, etc.
How to write a recipe?
- Layer directory – Firstly, create a layer directory and name it meta_name, for e.g. meta-digitalgate.
- Configuration file – Secondly, inside the layer directory, create a configuration directory with a layer.conf file in it: Conf/layer.conf
- Recipe directory – After that, Create a recipe directory in the layer I.e, meta-digitalgate/dgate.
- .bb file – Then create the bitbake recipe file I.e, meta-digitalgate/dgate/dgate_1.0.bb. File format: _.bb file
- Terminology
- ${WORKDIR} -this is the location inside of your build:
- Build/tmp/work///
- ${PN} – Package name I.e name of the recipe. Same to your .bb file.
- ${PV} – Package version I.e version of the recipe
- SRC_URI = “the file of your recipe is built off of.” This can be a .zip .c, or whichever file you need for the build.
- Md5, sha256 – these can be found by typing md5sum in cmd.
Layers
They are a collection of recipes that are linked. To personalize your build, you can use layers to group together related metadata. When creating several architectures, layers also separate information. The ability of layers to override earlier standards is hierarchical. You can use any number of Yocto Project layers and personalize the build by adding your own layers after them.
Why do you want to create a new layer?
- Store recipes for your own software projects
- You can create your own images
- You can stabilize patches/modifications on other people’s recipes
What is inside of a layer?
Here we have conf, classes and recipes. Inside of conf folder, we have the layer.conf file where we can modify the setting for our image. Our classes are called bb classes and you can also create your own custom classes. And we have the recipes and inside of them we have some directories which contain bb files (.bb, .bbappend)
How to create a layer? How to add layers/custom layers?
There are a few commands for creating your layers, adding your layers to the build, and listing your layers.
- bitbake-layers create-layer meta-xyz
This one creates a layer with the name that you gave as a parameter to the create command.
- bitbake-layers add-layer meta-xyz
This command is adding the layer to the build.
- bitbake-layers show-layers
It shows you the layer that you create and other layers which you already had.
Bitbake
BitBake is a Yocto Project core component that you can use to produce images by the OpenEmbedded build system. While BitBake is an important part of the build system, it is maintained independently of the Yocto Project.
It is a general task execution engine that allows shell and Python jobs to run effectively and in parallel while adhering to intricate inter-task dependencies. In a nutshell, BitBake is a built engine that performs tasks by executing recipes defined in a certain format.
What are the BitBake common targets?
- core-image-minimal;
- core-image-sato;
- meta-toolchain;
- meta-ide-support.
Packages
In the Yocto Project, this phrase refers to the packaged output of a recipe produced by BitBake (“baked recipe”). The built binaries produced from the recipe’s sources are typically referred to as a package. BitBake is a program that allows you to “bake” something.
Another aspect worth mentioning is that recipes were once referred to as packages within the Yocto Project, which explains the existence of some BitBake variables that appear to be misnamed (PR, PV, and PE).
Open Embedded Layer Index is the best tool to use in Yocto to look for packages.
Packages Group
Package groups are recipes created solely to build dependencies in order to make image generation easier.
A collection of package elements is referred to as a package group. Package groups allow for the definition of typically associated items as a single unit that may be tied to a rate code or a reservation. A Bed and Breakfast package, for example, can include a room and breakfast service for a predetermined price.
Bitbake Packages
- Fetching (downloading source);
- Unpacking (extracting);
- Patching (patch the local changes);
- Configuring(configure the source code);
- Staging;
- Installing(install the executable);
- Packaging(creates a .rpm, .deb).
And if you look during the build process, you can see these commands:
- do_fetch;
- do_unpack;
- do_patch;
- do_configure;
- do_compile;
- do_stage;
- do_install;
- do_package.
QEMU Emulator
QEMU is an open-source emulator that is free to use. It uses dynamic binary translation to imitate the machine’s processor and provides a choice of hardware and device models for the machine, allowing it to run a range of guest operating systems.

To emulate a 64-bit Arm machine, run the qemu-system-aarch64 program, and to emulate a 32-bit Arm machine, use either qemu-system-arm or qemu-system-aarch64. In general, command lines that work with qemu-system-arm will work with qemu-system-aarch64 as well.
Example of building for a board
STM32MP157a-DK1 BOARD
Firstly , we need to create a directory for the project.
					mkdir $HOME/work/stm32mp1
cd $HOME/work/stm32mp1
Secondly, it is required to get the packages for the build.
Sudo apt install bc build-essential chrpath cpio diffstat gawk git python texinfo wget gdisk
					mkdir $HOME/work/stm32mp1
cd $HOME/work/stm32mp1
Downloading Yocto:
					git clone git://git.yoctoproject.org/poky.git
cd $HOME/work/stm32mp1/poky
git checkout -b dunfell-23.0.10 dunfell-23.0.10
After that, adding the stm32mp layers:
					cd $HOME/work/stm32mp1
git clone -b dunfell git://git.openembedded.org/meta-openembedded
git clone -b dunfell https://github.com/STMicroelectronics/meta-st-stm32mp.git
Then, set up the build environment:
					cd $HOME/work/stm32mp1
source poky/oe-init-build-env
Afterward, update conf/bblayers.conf:
					BBLAYERS ?= " \
  /home/<username>/work/stm32mp1/poky/meta \
  /home/<username>/ work/stm32mp1/poky/meta-poky \
  /home/<username>/ work/stm32mp1/poky/meta-yocto-bsp \
  "

BBLAYERS ?= " \
  /home/<username> work/stm32mp1/poky/meta \
  /home/<username>/ work/stm32mp1/poky/meta-poky \
  /home/<username>/ work/stm32mp1/poky/meta-yocto-bsp \
  /home/<username>/ work/stm32mp1/meta-openembedded/meta-oe \
  /home/<username>/ work/stm32mp1/meta-openembedded/meta-python \
  /home/<username>/ work/stm32mp1/meta-st-stm32mp \
  "
Then build:
MACHINE=stm32mp1 bitbake core-image-minimal

Lastly, the After build:
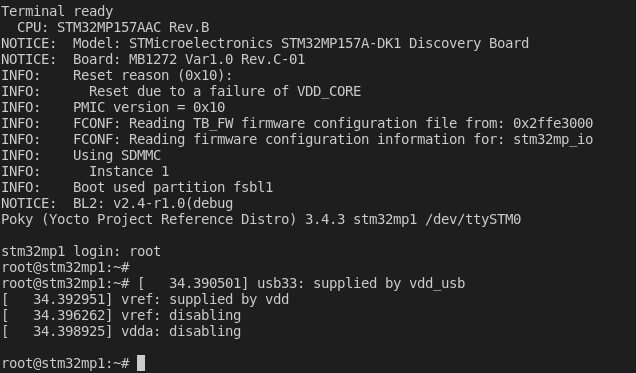
After building the board you can start using it. Custom Linux is installed on your board with all the functionality that you have included in the build.
Conclusion
The Yocto build system consists primarily of recipes, layers, and configuration files that are parsed by the Bitbake tool to generate a Linux file system image that can then be run on target hardware.
To conclude, Yocto Project is suitable for embedded and IoT devices with limited resources. Embedded developers, unlike full Linux distributions, can use Yocto Project to create a condensed version for embedded devices.
See other articles:

Optimizing our Custom Motor Controller for Motion Control
Using our carefully designed board, we demonstrate the impressive power and flexibility of integrating modern technologies into motor controllers. In the realm of small

What it means to make an efficient Battery Management System?
Digital Gate is excited to introduce you to one of our flagship products: an efficient and secure Battery Management System (BMS), meticulously designed and

Embedded World 2024
DigitalGate is excited to announce its forthcoming participation at Embedded World 2024 taking place in Nuremberg from the 9th to the 11th of April.
Capacitance Preservation: Strategies for DC Bias in MLCCs
Is the capacitance of the capacitor always same? Multilayer ceramic capacitors (MLCCs) offer several advantages that make them a popular choice for various electronic
Important New C++ Features
C++ 20 and 23 have a lot of new features which can reduce boilerplate code, increase efficiency and make the code drastically more readable.
Embedded World 2023
DigitalGate is excited to announce its participation at the Embedded World 2023 organized in Nuremberg between 14.03 and 16.03. Come, and meet us at

